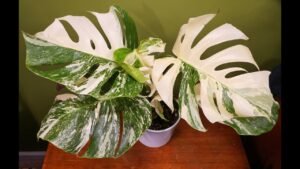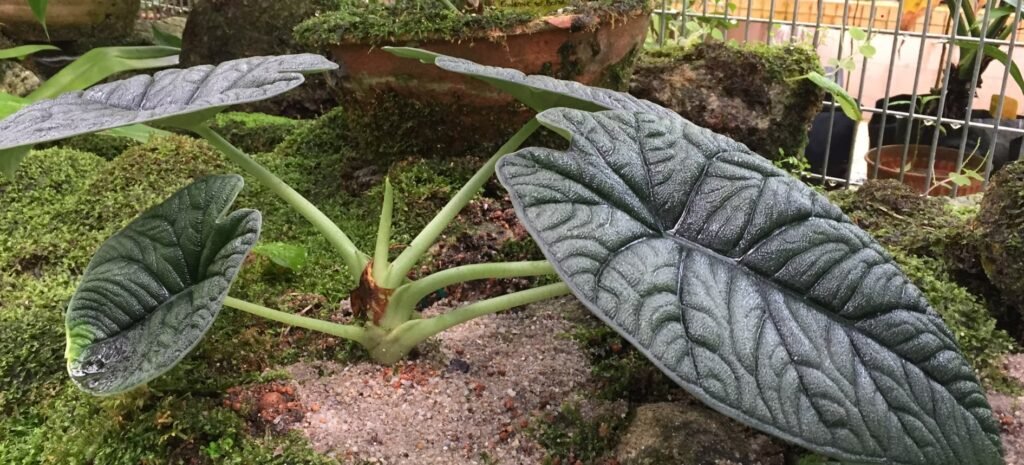
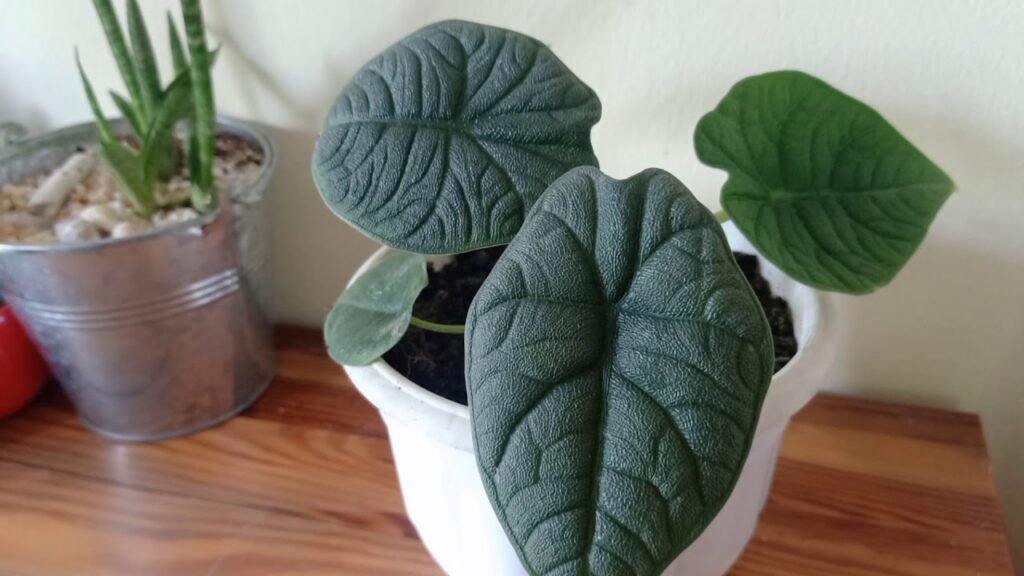
Alocasia Melo, also known as “Melo Alocasia,” is a stunning tropical plant prized for its unique foliage and impressive appearance. Proper care is crucial to ensure your Alocasia Melo remains healthy and vibrant. Here’s a comprehensive care guide to help you nurture your plant:
Light
- Indirect Bright Light: Alocasia Melo thrives in bright, indirect light. Place your plant near a window where it can receive filtered sunlight or in a well-lit room. Avoid exposing it to direct sunlight, as it can scorch the leaves.
Temperature
- Warm Environment: Alocasia Melo prefers warm temperatures between 65-80°F (18-27°C). Avoid exposing the plant to cold drafts or sudden temperature fluctuations, as it can stress the plant.
Humidity
- High Humidity Levels: Alocasia Melo enjoys high humidity. Increase humidity levels by misting the leaves regularly, using a humidifier, or placing the plant on a humidity tray filled with water and pebbles.
Watering
- Keep Soil Moist: Alocasia Melo prefers consistently moist soil. Water your plant when the top inch of soil feels dry to the touch, but avoid overwatering, as it can lead to root rot. Ensure proper drainage to prevent waterlogging.
Soil
- Well-Draining Potting Mix: Use a well-draining potting mix rich in organic matter, such as a mix of peat moss, perlite, and pine bark. Ensure the pot has drainage holes to allow excess water to escape.
Potting
- Choose the Right Pot: Select a pot that provides ample room for root growth and has drainage holes. Repot your Alocasia Melo every 1-2 years or when it outgrows its current pot.
Fertilizing
- Regular Feeding: Feed your Alocasia Melo with a balanced, water-soluble fertilizer diluted to half strength every 4-6 weeks during the growing season (spring and summer). Avoid fertilizing during winter months.
Pruning
- Remove Dead or Yellowing Leaves: Prune away any dead, damaged, or yellowing leaves using clean, sharp scissors or pruning shears. This helps maintain the plant’s appearance and promotes new growth.
Pests and Diseases
- Monitor for Pests: Keep an eye out for common pests such as spider mites, aphids, and mealybugs. Treat infestations promptly with insecticidal soap or neem oil.
- Prevent Diseases: Ensure good air circulation around the plant to prevent fungal diseases. Avoid overwatering and allow the soil to dry out slightly between waterings.
Seasonal Care
- Winter Dormancy: Alocasia Melo may enter a period of dormancy during winter. Reduce watering and fertilizing during this time and keep the plant in a slightly cooler location.
Propagating Alocasia Melo
Propagating Alocasia Melo is a rewarding way to expand your plant collection or share your love for this beautiful tropical plant with friends and family. Here’s how you can propagate Alocasia Melo through division:
Division Method
- Choose a Healthy Plant: Select a mature and healthy Alocasia Melo plant for propagation. Ensure the plant has multiple stems or offsets to divide.
- Prepare the Plant: Water the plant thoroughly a day before propagation to ensure the soil is moist but not waterlogged. This makes it easier to separate the rhizomes.
- Gently Remove the Plant from its Pot: Carefully remove the Alocasia Melo from its pot, taking care not to damage the roots. Gently loosen the soil around the roots to make it easier to see and access the rhizomes.
- Separate the Rhizomes: Locate the rhizomes, which are thick, horizontal stems that grow beneath the soil surface. Use your hands or a clean, sharp knife to carefully divide the rhizomes into sections, ensuring each section has at least one healthy stem and a portion of roots attached.
- Trim Excess Roots: Trim any excess or damaged roots from each division using clean scissors or pruning shears. This encourages the plant to focus its energy on new growth.
- Plant the Divisions: Plant each division in its own pot filled with well-draining potting mix. Position the divisions so that the rhizomes are just below the soil surface and the stems are upright.
- Water Thoroughly: Water the newly planted divisions thoroughly to settle the soil and hydrate the roots. Keep the soil consistently moist in the following weeks to promote root establishment.
- Provide Optimal Conditions: Place the newly propagated divisions in a warm, humid environment with bright, indirect light. Avoid placing them in direct sunlight, as this can scorch the leaves.
- Monitor and Care: Monitor the propagated divisions regularly for signs of growth and adjust care as needed. Maintain high humidity levels and provide regular watering and fertilizing to encourage healthy growth.
- Transplanting: Once the divisions have established strong roots and are showing new growth, they can be transplanted into larger pots if desired. Follow the same planting and care instructions as for mature plants.
Tips for Success
- Propagate Alocasia Melo during the active growing season, typically in spring or early summer, to maximize success.
- Use a clean and sharp knife or pruning shears to prevent damage to the rhizomes.
- Keep newly propagated divisions in a warm and humid environment to encourage root development and growth.
Potting and Repotting Alocasia Melo
Potting and repotting are essential aspects of caring for Alocasia Melo, ensuring that the plant has adequate space for root growth and optimal conditions for thriving. Here’s a detailed guide on potting and repotting your Alocasia Melo:
Potting
- Selecting the Right Pot: Choose a pot that is 1-2 inches larger in diameter than the current one and has drainage holes at the bottom. Alocasia Melo prefers pots made of porous materials like clay or terracotta, as they allow excess moisture to evaporate more easily.
- Preparing the Pot: Place a small piece of mesh or a coffee filter over the drainage holes to prevent soil from escaping while still allowing water to drain freely.
- Choosing the Potting Mix: Use a well-draining potting mix that is rich in organic matter. A mix of peat moss, perlite, and pine bark is ideal for Alocasia Melo. Avoid using heavy soils that retain too much moisture, as they can lead to root rot.
- Potting the Plant: Add a layer of potting mix to the bottom of the pot, then gently remove the Alocasia Melo from its current pot. Carefully loosen the roots and place the plant in the center of the new pot. Fill in the remaining space with potting mix, ensuring that the rhizome is just below the soil surface.
- Watering: After potting, water the plant thoroughly to settle the soil and hydrate the roots. Allow any excess water to drain away, and empty the saucer beneath the pot to prevent waterlogging.
- Placement: Place the potted Alocasia Melo in a location with bright, indirect light. Avoid placing it in direct sunlight, as this can scorch the leaves. Ensure that the plant receives adequate airflow to prevent fungal issues.
Repotting
- Signs It’s Time to Repot:
- Roots protruding from the drainage holes.
- Plant becoming root-bound, causing slower growth.
- Soil drying out quickly after watering.
- Plant toppling over due to unstable root ball.
- Timing: Repot Alocasia Melo during the active growing season, typically in spring or early summer. Avoid repotting during dormancy or when the plant is stressed.
- Preparing for Repotting: Water the plant thoroughly a day before repotting to loosen the roots and make them easier to work with. Prepare a larger pot with fresh potting mix as described above.
- Repotting Process: Gently remove the plant from its current pot, being careful not to damage the roots. If the roots are tightly bound, gently tease them apart with your fingers. Trim any dead or rotting roots with clean scissors.
- Potting in the New Pot: Follow the potting steps described above, ensuring that the plant is positioned at the same depth as before. Add more potting mix around the sides, pressing gently to firm it in place.
- Aftercare: Water the repotted plant thoroughly and place it in its usual location. Avoid fertilizing for a few weeks to allow the plant to recover from the repotting process.
Final Tips
- Don’t Overpot: Alocasia Melo prefers slightly snug pots, so avoid choosing a pot that is too large, as it can hold excess moisture and lead to root rot.
- Regular Inspection: Check the roots and soil regularly to monitor the plant’s health and determine if repotting is necessary.
Common Problems with Alocasia Melo
While Alocasia Melo is a resilient plant, it can encounter a few common issues. Understanding these problems and how to address them will help keep your plant healthy and thriving. Here are some common problems you may encounter with your Alocasia Melo:
Yellowing Leaves
- Cause: Yellowing leaves can indicate overwatering, underwatering, or insufficient light.
- Solution: Adjust your watering schedule to ensure the soil is evenly moist but not waterlogged. Provide adequate light by placing the plant in a location with bright, indirect sunlight.
Brown Leaf Tips
- Cause: Brown leaf tips are often a sign of low humidity, underwatering, or excess fertilizer.
- Solution: Increase humidity around the plant by misting its leaves regularly or using a humidity tray. Ensure proper watering by checking the soil moisture regularly. Avoid overfertilizing, as it can lead to salt build-up in the soil.
Leaf Dropping
- Cause: Leaf dropping can occur due to stress from temperature fluctuations, drafts, or overwatering.
- Solution: Maintain consistent environmental conditions by avoiding cold drafts and sudden temperature changes. Ensure proper drainage to prevent overwatering.
Pest Infestations
- Cause: Common pests such as spider mites, aphids, and mealybugs can infest Alocasia Melo.
- Solution: Treat pest infestations promptly with insecticidal soap or neem oil. Keep the plant clean by wiping the leaves regularly with a damp cloth.
Fungal Diseases
- Cause: Fungal diseases like root rot can occur due to overwatering or poor drainage.
- Solution: Ensure proper drainage by using well-draining soil and pots with drainage holes. Water the plant only when the top inch of soil is dry.
Edema
- Cause: Edema appears as small blisters or bumps on the leaves due to overwatering or fluctuating humidity.
- Solution: Maintain consistent watering and humidity levels. Avoid overwatering and ensure good airflow around the plant.
Wilting
- Cause: Wilting can result from underwatering, overwatering, or root rot.
- Solution: Check the soil moisture and adjust your watering accordingly. If the soil is waterlogged, allow it to dry out before watering again. Trim any affected roots if root rot is present.
Slow Growth
- Cause: Slow growth may occur due to insufficient light, low humidity, or inadequate nutrition.
- Solution: Provide bright, indirect light and increase humidity levels. Fertilize the plant regularly during the growing season with a balanced fertilizer.
Leaf Curling
- Cause: Leaf curling can be caused by underwatering, overfertilizing, or low humidity.
- Solution: Ensure proper watering by keeping the soil evenly moist. Avoid overfertilizing and provide adequate humidity by misting the leaves or using a humidifier.
Frequently Asked Questions
How often should I water my Alocasia Melo?
Water your Alocasia Melo when the top inch of soil feels dry to the touch. Ensure the soil is evenly moist but not waterlogged. Adjust watering frequency based on environmental factors such as temperature and humidity.
Can I place my Alocasia Melo in direct sunlight?
Alocasia Melo prefers bright, indirect light. Avoid placing it in direct sunlight, as this can scorch the leaves. Instead, place it near a window where it can receive filtered sunlight or in a well-lit room.
How can I increase humidity for my Alocasia Melo?
You can increase humidity for your Alocasia Melo by misting its leaves regularly, using a humidity tray filled with water and pebbles, or placing a humidifier near the plant. Grouping plants together can also help create a more humid microclimate.
Why are the leaves of my Alocasia Melo turning yellow?
Yellowing leaves can indicate overwatering, underwatering, or insufficient light. Check the soil moisture and adjust your watering schedule accordingly. Ensure the plant receives adequate indirect light to maintain its health.
How can I propagate my Alocasia Melo?
Alocasia Melo can be propagated through division. Separate the rhizomes during repotting, ensuring each division has at least one healthy stem and a portion of roots attached. Plant the divisions in well-draining soil and provide optimal care for successful propagation.
What should I do if my Alocasia Melo has pest infestations?
If your Alocasia Melo is infested with pests such as spider mites, aphids, or mealybugs, treat the infestation promptly with insecticidal soap or neem oil. Wipe the leaves regularly with a damp cloth to keep the plant clean and free from pests.
When is the best time to repot my Alocasia Melo?
The best time to repot your Alocasia Melo is during the active growing season, typically in spring or early summer. Repotting during this time allows the plant to recover quickly and establish itself in its new pot before entering a period of dormancy.